Appendix
Appendix A: OAM
- Run the OAM server
cd webconsole go run server.go - Access the OAM by
URL: http://localhost:5000 Username: admin Password: free5gc - Now you can see the information of currently registered UEs (e.g. Supi, connected state, etc.) in the core network at the tab "DASHBOARD" of free5GC webconsole
Note: You can add the subscribers here too
Appendix B: Orchestrator
Please refer to free5gmano
Appendix C: IPTV
Please refer to free5GC/IPTV
Appendix D: System Environment Cleaning
The below commands may be helpful for development purposes.
- Remove POSIX message queues
ls /dev/mqueue/rm /dev/mqueue/*
- Remove gtp5g tunnels (using tools in libgtp5gnl)
cd ./src/upf/lib/libgtp5gnl/tools./gtp5g-tunnel list pdr./gtp5g-tunnel list far
- Remove gtp5g devices (using tools in libgtp5gnl)
cd ./src/upf/lib/libgtp5gnl/toolssudo ./gtp5g-link del {Dev-Name}
Appendix E: Change Kernel Version
- Check the previous kernel version:
uname -r - Search for a specific kernel version and install (e.g.
5.0.0-23-generic)
sudo apt update # make sure package lists are up to date
sudo apt search 'linux-image-5.0.0-23-generic'
Example output for the command above:
Sorting... Done
Full Text Search... Done
linux-image-5.0.0-23-generic/focal-updates,focal-security 5.0.0-23.126~20.04.1 amd64
  Signed kernel image generic
Install the new kernel image:
sudo apt install linux-image-5.0.0-23-generic linux-headers-5.0.0-23-generic - Update initramfs and GRUB
sudo update-initramfs -u -k all sudo update-grub - Reboot, enter GRUB, and select the newly installed kernel version
5.0.0-23-generic
sudo reboot - Reinstall the GTP-U kernel module on the new kernel version
Follow the Retrieve the 5G GTP-U kernel module using git and build it instructions of the install guide
Optional: Remove Kernel Image
sudo apt remove linux-image-5.0.0-23-generic linux-headers-5.0.0-23-generic
Appendix F: Program the SIM Card
Install packages:
sudo apt-get install pcscd pcsc-tools libccid python-dev swig python-setuptools python-pip libpcsclite-dev
sudo pip install pycrypto
Download PySIM
git clone git://git.osmocom.org/pysim.git
Change to pyscard folder and install
cd <pyscard-path>
sudo /usr/bin/python setup.py build_ext install
Verify your reader is ready
sudo pcsc_scan
Check whether your reader can read the SIM card
cd <pysim-path>
./pySim-read.py –p 0
Program your SIM card information
./pySim-prog.py -p 0 -x 208 -y 93 -t sysmoUSIM-SJS1 -i 208930000000003 --op=8e27b6af0e692e750f32667a3b14605d -k 8baf473f2f8fd09487cccbd7097c6862 -s 8988211000000088313 -a 23605945
You can get your SIM card from sysmocom.
Appendix G: Install MongoDB 7.0.x on Ubuntu Server 22.04.03
Check that the system CPU supports AVX instructions as it's required since MongoDB 5.0. If not (i.e. the command below returns empty output), use MongoDB 4.4.x (see step 3 from installation prerequisites instructions)
grep --color avx /proc/cpuinfo
Before you begin the installation, update the package manager database and make sure MongoDB prerequisites are installed
sudo apt update
sudo apt install gnupg curl
Add MongoDB public GPG key
curl -fsSL https://pgp.mongodb.com/server-7.0.asc | \
   sudo gpg -o /usr/share/keyrings/mongodb-server-7.0.gpg --dearmor
Note: if you are installing a version other than 7.0, remember, change it on the command above
Create the APT list entry file using the command below
echo "deb [ arch=amd64,arm64 signed-by=/usr/share/keyrings/mongodb-server-7.0.gpg ] https://repo.mongodb.org/apt/ubuntu jammy/mongodb-org/7.0 multiverse" | sudo tee /etc/apt/sources.list.d/mongodb-org-7.0.list
Refresh the package database then install MongoDB
sudo apt update
sudo apt install -y mongodb-org
For detailed instructions on how to freeze the installed version or install a specific version of MongoDB, please, check the reference below or follow this direct URL
Don't forget to load the DB service using
sudo systemctl start mongod
Reference: MongoDB official website
Appendix H: Using the reload_host_config.sh script
The script was designed to help reapplying the configurations after a VM reboot
Usage
Its usage is fairly simple, just run
cd ~/free5gc # go back to free5gc's main folder
sudo reload_host_config.sh <dn_interface>
For example, if your DN interface (e.g. free5GC's VM LAN interface) is called enp0s4, the command above will be
sudo reload_host_config.sh enp0s4
Note: In Ubuntu Server 20.04 and 22.04 the dn_interface may be called enp0s3 or enp0s4 by default
If you are unsure about the interface name, run ip a to help to figure it out (see the image below)
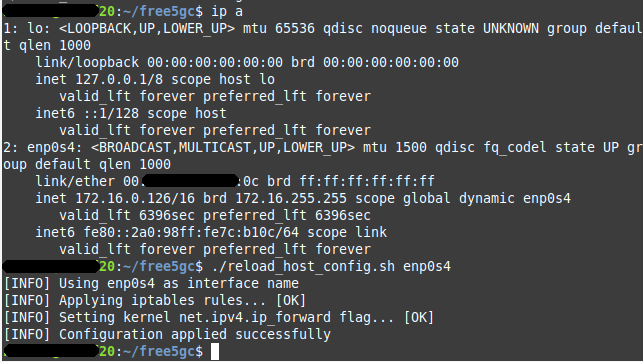
An example of the expected output is depicted above
Reset iptables rules
There is a parameter to completely reset the firewall rules (by default, the script only appends free5gc's required rules)
Just add -reset-firewall to the script input
sudo reload_host_config.sh enp0s4 -reset-firewall
So it will clear all rules, then apply the required rules