Installing N3IWUE
In this demo we will practice:
- Installing N3IWUE
- Configuring free5GC and N3IWUE
- Running N3IWUE to connect free5GC
1. Install N3IWUE VM
Repeat the steps of cloning free5gc VM from the base VM, create a new VM for the N3IWUE:
- You can refer to Installing free5gc to install free5gc VM.
- Name the VM
N3IWUE, and create new MAC addresses for all network cards. - Make sure the VM has internet access and can log in using SSH.
- Change the hostname to
N3IWUE. - Make the Host-only network interface have static IP address
192.168.56.103. - Reboot the N3IWUE VM, as well as the free5gc VM.
- You can ping
192.168.56.101from the N3IWUE VM, and alsoping 192.168.56.103from the free5gc VM.
2. Install N3IWUE
Go to N3IWUE GitHub Repo.
To download N3IWUE in home directory:
cd ~
git clone https://github.com/free5gc/n3iwue.git
cd n3iwue
Update and upgrade the VM of N3IWUE:
sudo apt update
sudo apt upgrade
Install required tools:
sudo apt install make
sudo apt install libsctp-dev lksctp-tools
sudo apt install iproute2
Install Golang (use 1.21.6 version in this demonstrate):
wget https://dl.google.com/go/go1.21.6.linux-amd64.tar.gz
sudo tar -C /usr/local -zxvf go1.21.6.linux-amd64.tar.gz
mkdir -p ~/go/{bin,pkg,src}
echo 'export GOPATH=$HOME/go' >> ~/.bashrc
echo 'export GOROOT=/usr/local/go' >> ~/.bashrc
echo 'export PATH=$PATH:$GOPATH/bin:$GOROOT/bin' >> ~/.bashrc
echo 'export GO111MODULE=auto' >> ~/.bashrc
source ~/.bashrc

# check your go installation
go version
Build N3IWUE
cd ~/n3iwue
make
3. Use WebConsole to Add UE
Open your web browser from your host machine, and enter the URL http://192.168.56.101:5000
- On the login page, enter username
adminand passwordfree5gc. - Once logged in, widen the page until you see “Subscribers” on the left-hand side column.
- Click on the
Subscriberstab and then on theNew Subscriberbutton - Scroll down to
Operator Code Typeand change it from "OPc" to "OP". - Make sure the following config between
n3iwue/config/n3ue.yamland theSubscriberyou are creating are the same:- SUPI(IMSI) (ex. 208930000001234)
- K
- SQN
- OP value (Operator Code Value)
- Scroll the page all the way down and click on
Create.
4. Setting N3IWF Config
In free5gc VM, we need to edit N3IWF config file ~/free5gc/config/n3iwfcfg.yaml
Replace IKEBindAddress from 172.16.2.100 to 192.168.56.101, namely from:
IKEBindAddress: 172.16.2.100 # Nwu interface IP address (IKE) on this N3IWF
into:
IKEBindAddress: 192.168.56.101 # Nwu interface IP address (IKE) on this N3IWF
5. Setting N3IWUE
To let N3IWUE knows where is the N3IWF is, we need to edit the UE config file ~/n3iwue/config/n3ue.yaml in N3IWUE VM
Replace these parameters:
N3IWFInformation:
  IPSecIfaceAddr: 10.0.1.1 # IP address of Nwu interface (IKE) on N3IWF

N3UEInformation:
  IPSecIfaceName: ens38 # Name of Nwu interface (IKE) on this N3UE
  IPSecIfaceAddr: 10.0.1.4 # IP address of Nwu interface (IKE) on this N3UE
into:
N3IWFInformation:
  IPSecIfaceAddr: 192.168.56.101 # IP address of Nwu interface (IKE) on N3IWF

N3UEInformation:
  IPSecIfaceName: enp0s8 # Name of Nwu interface (IKE) on this N3UE (your interface name)
  IPSecIfaceAddr: 192.168.56.103 # IP address of Nwu interface (IKE) on this N3UE
6. Testing N3IWUE with free5GC
SSH into free5gc. If you have rebooted free5gc, remember to run:
cd free5gc
sudo ./reload_host_config.sh <Interface Name>

eg: sudo ./reload_host_config.sh ens18
Tip: Set net.ipv4.ip_forward=1 in /etc/sysctl.conf to enable packet forwarding permanently
In free5gc VM:
cd ~/free5gc
./run.sh -n3iwf
In N3IWUE VM:
cd ~/n3iwue
./run.sh
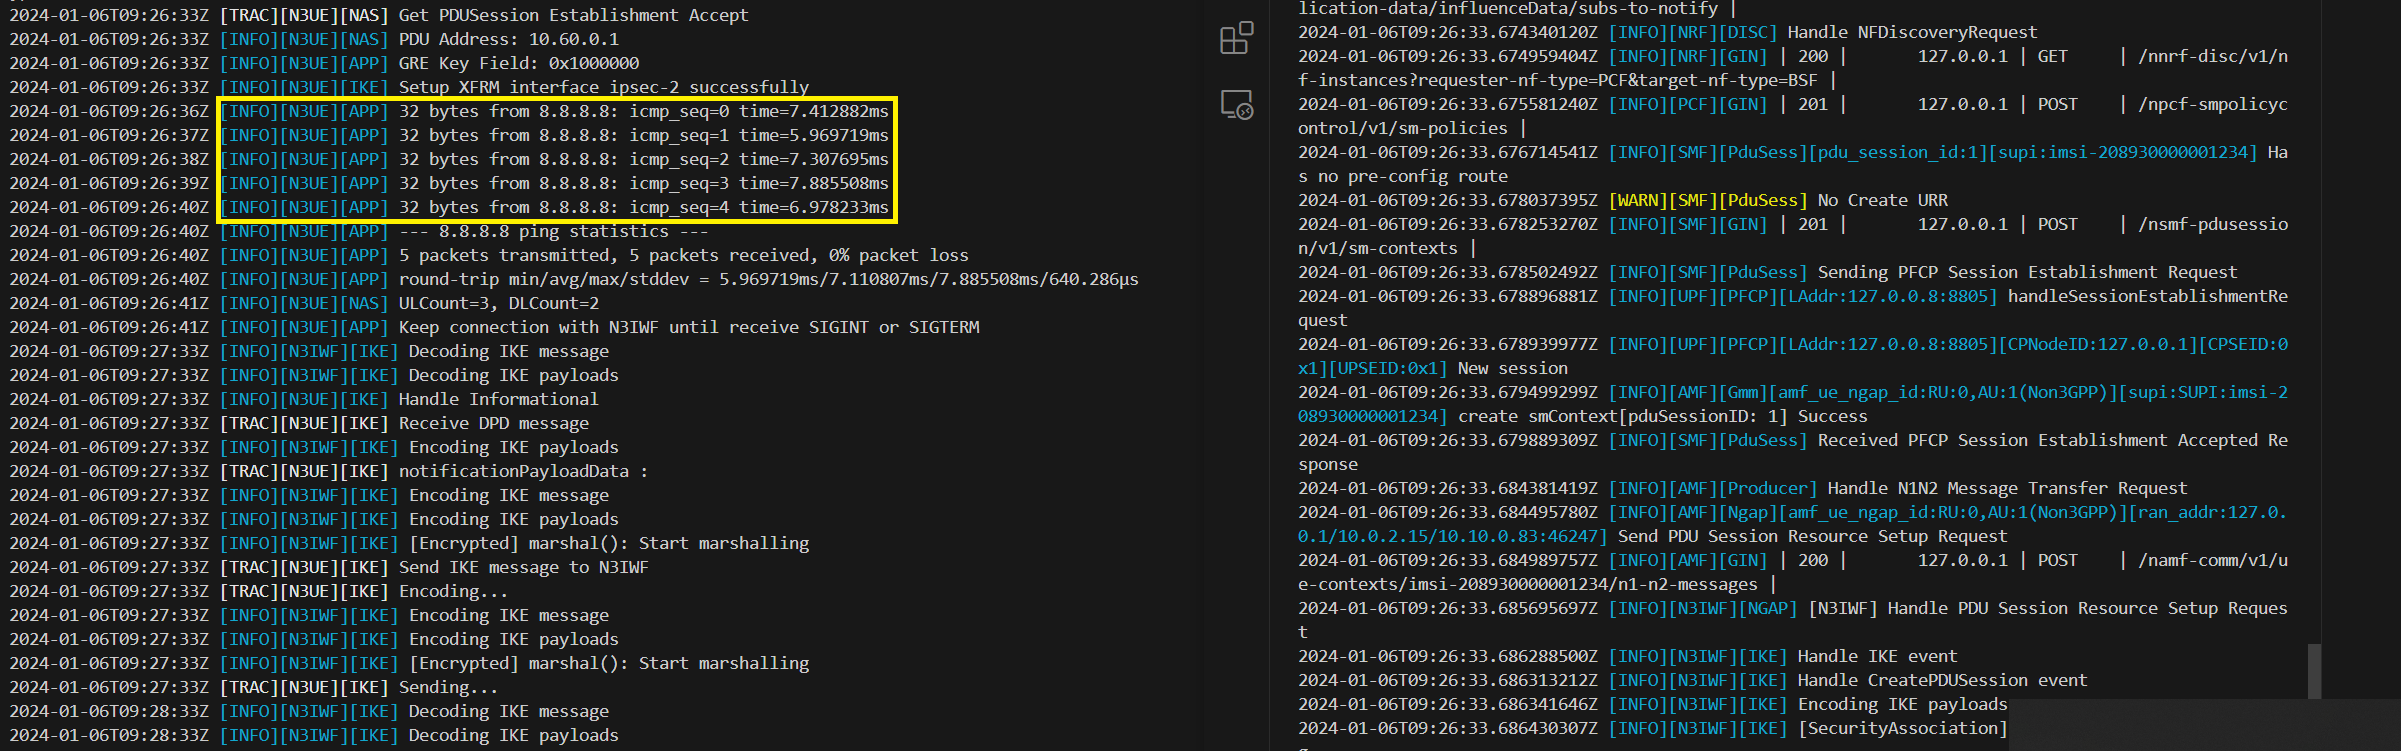
7. Result
Success: N3IWUE can ping data network through N3IWF